Tag: Source edit |
|||
| (50 intermediate revisions by 13 users not shown) | |||
| Line 1: | Line 1: | ||
[[File:Teamfight Tactics Teaser 01.jpg|thumb|right|400px|Teamfight Tactics Arena]] |
[[File:Teamfight Tactics Teaser 01.jpg|thumb|right|400px|Teamfight Tactics Arena]] |
||
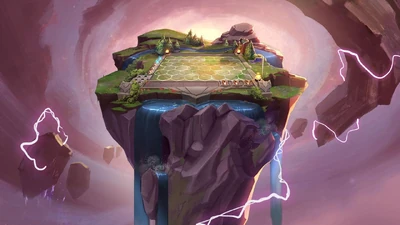
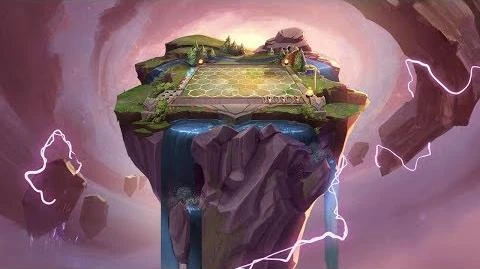
The '''Arena''' is the island that encompasses the battlefield of {{tip|Teamfight Tactics}}, which includes the battlefield for [[Champions (Teamfight Tactics)|champions]] to fight, the champion bench, and the Gold Generators. |
The '''Arena''' is the island that encompasses the battlefield of {{tip|Teamfight Tactics}}, which includes the battlefield for [[Champions (Teamfight Tactics)|champions]] to fight, the champion bench, and the Gold Generators. |
||
| + | |||
| + | Each player has their own arena map and each player travels to another players map or attacks from their own arena depending on the round. |
||
== Gameplay == |
== Gameplay == |
||
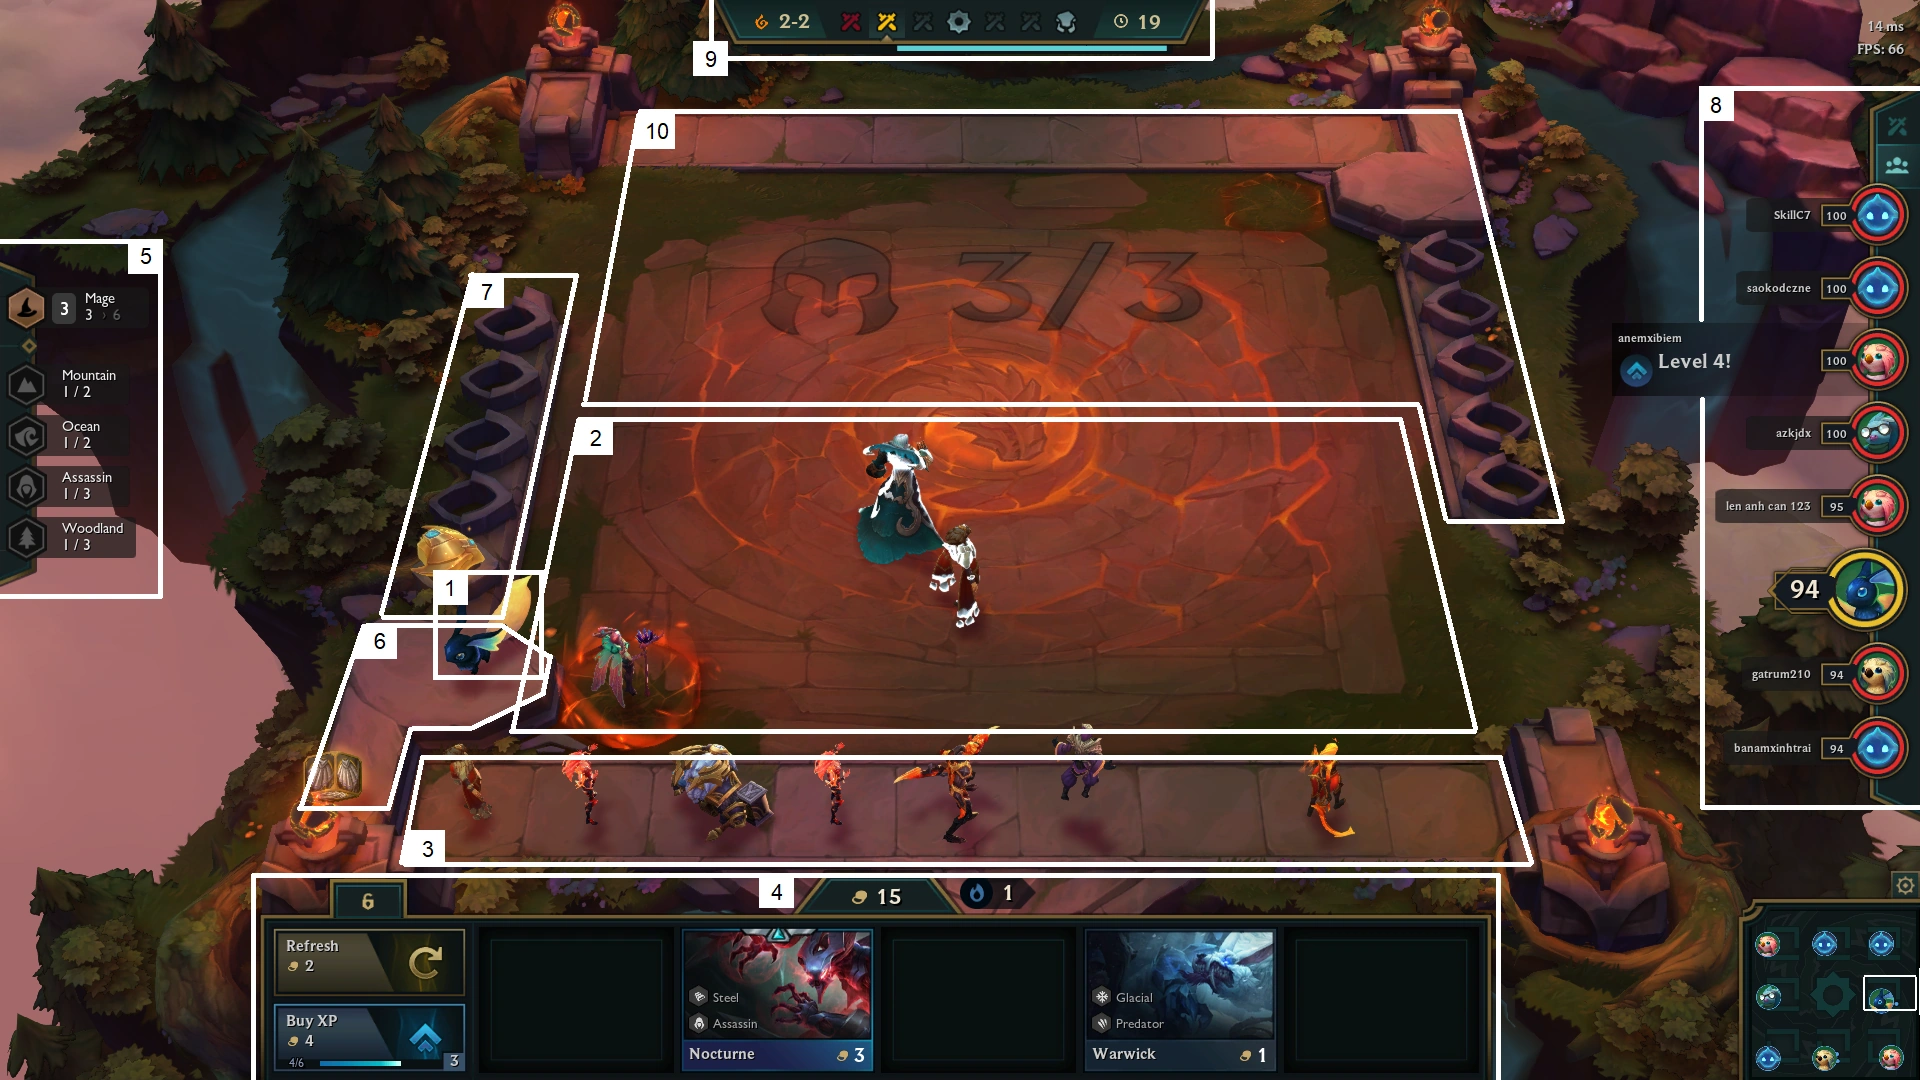
| ⚫ | |||
| + | [[File:Teamfight Tactics Layout Set 2.png|thumb|center|700px]] |
||
| + | # '''[[Little Legend (Teamfight Tactics)|Little Legend]]:''' A small being that the player is able to control around the map. A Little Legend is present at all times. |
||
| + | # '''Battlefield Side:''' Where the fighting happens. Allocated battlefield is hexagonal board with size 4 x 7, situated on the southern half. If your unit cap is not reached, the leftmost champion(s) on your Bench is automatically placed near the center of the Battlefield. If your Bench limit is reached and you enter the carousel, the champion you picked is placed on the bottom row, on the furthest left available space. |
||
| + | # '''Bench:''' Champions bought from the Store are placed here. Up to 9 champions are inventoried until you move them onto the battlefield. |
||
| + | # '''Store:''' You'll see a random selection of champions, including duplicates, from a shared pool in the store. Duplicate champions combine to create stronger versions of that champion. Possession of three duplicates will upgrade into one high-level champion (Bench & Battlefield). If there is no room on the bench but there is enough of a champion in the store to upgrade an owned one, then when the player tries to purchase one of them, enough will be bought to upgrade the unit and use no extra space. |
||
| + | #* '''Lock/unlock the store:''' You can lock your store so that it won't automatically refresh at the start of the round. This is useful if there's something you want but can't afford in a given moment. |
||
| + | #* '''Refresh ({{g|2}}):''' Pay a little gold to refresh the champions in the store. This happens for free at the start of each round, but sometimes you'll want to see more options. |
||
| + | #* '''Buy XP ({{g|4}}):''' Pay gold to gain {{as|4 experience points}}. The higher your level, the more (powerful and expensive) champions you can pick from. |
||
| + | # '''Trait Tracker:''' Track the origin and class bonuses that your champions qualify for. Displays up to 10 origin and class. On other player arena, it shows that player trait bonuses instead. |
||
| + | # '''Item Inventory:''' Items go here until they're equipped to champions (drag and drop to equip). When you sell a champion with items equipped, the items return here. You can have up to 10 items. You can hover items together to see the combination. |
||
| + | # '''Gold Generators:''' Gold generators appear based on how much gold you already have. Each generator is worth one interest gold at the start of your next turn. |
||
| + | # '''Scoreboard:''' Tab 1 shows all players' health in the game. Click on players to view their arena. Tab 2 shows realtime damage output from your champions in the current round. |
||
| + | # '''Stage Tracker:''' Shows the current game element, and shows and records rounds of the current stage. It indicates rounds you won in blue, lost in red, current in yellow. Rounds that is not yet to play are gray out. Tells you which battle phase you're currently in and how much time is left. |
||
| + | # '''Opponent's Side:''' When facing another player's team, you'll also see their bench, item inventory, and gold generators. And of course, you'll encounter their Little Legend. |
||
| + | |||
<tabber> |
<tabber> |
||
| + | Current= |
||
| − | Curret= |
||
=== Battlefield === |
=== Battlefield === |
||
| ⚫ | |||
| − | * This is where the fight |
+ | * This is where the fight happens. The battlefield is a rectangular board filled with 8 x 7 hexagons. |
* When the round has not yet started, players can place and rearrange their champions on their half side (4 x 7) of the battlefield. |
* When the round has not yet started, players can place and rearrange their champions on their half side (4 x 7) of the battlefield. |
||
| ⚫ | |||
* There is a limit number of champions a player can play. This number increases as the game process, based on your Little Legend level. |
* There is a limit number of champions a player can play. This number increases as the game process, based on your Little Legend level. |
||
** The number of champions appear on the battlefield and the maximum number of champions appear in the enemy area during preparing state. |
** The number of champions appear on the battlefield and the maximum number of champions appear in the enemy area during preparing state. |
||
** If your unit cap is not reached, the leftmost champion(s) on Bench is automatically placed near the center of the Battlefield. |
** If your unit cap is not reached, the leftmost champion(s) on Bench is automatically placed near the center of the Battlefield. |
||
| − | ** Players can increase the number of champions at the beginning on the battlefield by acquiring the item {{TFTi|Force of Nature}}. |
+ | ** Players can increase the number of champions at the beginning on the battlefield by acquiring the item {{TFTi|Force of Nature}} or {{TFTi|Tactician's Crown}}. |
** When a round started, new units, and even new champions, may appear on the battlefield. This can come from abilities of champions or from their synergies. |
** When a round started, new units, and even new champions, may appear on the battlefield. This can come from abilities of champions or from their synergies. |
||
| Line 23: | Line 41: | ||
|-| |
|-| |
||
| − | Removed |
+ | Removed= |
| + | {{Removed|category=}} |
||
=== Elemental Hex === |
=== Elemental Hex === |
||
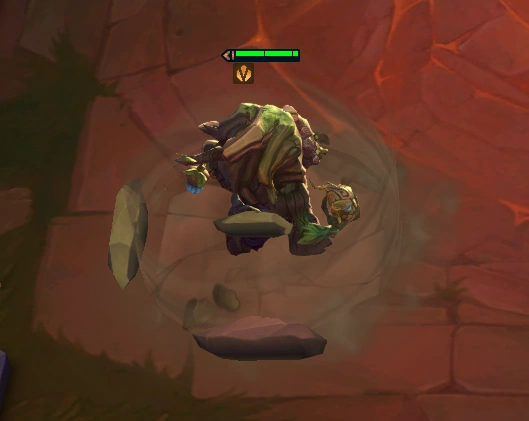
| − | [[File:Maokai on Mountain Hex.png| |
+ | [[File:Maokai on Mountain Hex.png|300px|right|Maokai on Mountain Hex.]] |
| − | Each game of TFT in ''Set 2'' will have an element assigned, spawing ''elemental hexes'' of that element during the planning phase. The hexes will spawn in the same places for all players '''on every round'''; the first appears at Stage 1-1, and the second one appears at Stage |
+ | Each game of TFT in ''Set 2'' will have an element assigned, spawing ''elemental hexes'' of that element during the planning phase. The hexes will spawn in the same places for all players '''on every round'''; the first appears at Stage 1-1, and the second one appears at Stage 3–1. |
A Champion that occupies the hex when the round starts may gain an elemental buff in the form of an item, provided that their inventory is not full. This buff is retained through the combat phase. |
A Champion that occupies the hex when the round starts may gain an elemental buff in the form of an item, provided that their inventory is not full. This buff is retained through the combat phase. |
||
| Line 34: | Line 53: | ||
* {{tip|TFT Ocean Hex|Ocean Hex}} |
* {{tip|TFT Ocean Hex|Ocean Hex}} |
||
* {{tip|TFT Mountain Hex|Mountain Hex}} |
* {{tip|TFT Mountain Hex|Mountain Hex}} |
||
| + | |||
| + | The elemental hexes return as a mechanic of the Ixtal in ''Set 9.5'' feature that changes each element according to the different games. |
||
</tabber> |
</tabber> |
||
== Skins == |
== Skins == |
||
| − | With the [[Missions#Battle Pass Milestones|Battle Pass]], players can earn skins. |
+ | With the [[Missions#Battle Pass Milestones|Battle Pass]], players can earn Battle Pass arena skins. Some are from the free pass, for example, the [[File:TFT Gizmos & Gadgets II Celebration of Tomorrow Arena.png|30px]] Celebration of Tomorrow. While some requires the premium ticket, for example, the [[File:TFT Gizmos & Gadgets II Toxitorium Arena.png|30px]] Toxitorium. |
| + | |||
| + | Outside of Battle Pass, player can buy Arena either directly (most purchaseable Arena), in bundle ([[File:TFT Golden Tiger Market Arena.png|30px]] Golden Tiger Market), or in game of chance.<ref>[https://youtu.be/QevkA6dBNS4?t=386 TFT Dev Drop: May 2022 Dev Video - Teamfight Tactics]</ref> |
||
| − | {{scroll box|maxheight=100%|content= |
+ | {{scroll box|maxheight = 100%|content = ;Base |
| ⚫ | |||
| − | ;Base |
||
| ⚫ | |||
| ⚫ | |||
| + | TFT Runic Arena.png|Runic<br />Mission or {{RP|450}} |
||
| ⚫ | |||
| − | + | TFT Rift Arena.png|Rift<br />Mission |
|
| − | + | TFT Arrowhead Arena.png|Arrowhead<br />Mission or {{RP|450}} |
|
| − | + | TFT Basic Draconic Arena.png|Basic Draconic<br />Mission |
|
| − | + | TFT Basic Verdant Arena.png|Basic Verdant<br />Mission or {{RP|450}} |
|
| − | + | TFT Basic Summoner's Arena.png|Basic Summoner's<br />Mission |
|
| − | + | TFT Storm Rift Arena.png|Storm Rift<br />Mission |
|
| + | </gallery> |
||
| − | Teamfight Tactics Storm Rift Arena.png|Storm Rift<br />Mission |
||
| + | |||
| ⚫ | |||
| ⚫ | |||
| ⚫ | |||
| ⚫ | |||
| + | TFT Dark Star Supernova Arena.png|Supernova<br />{{RP|1380}} |
||
</gallery> |
</gallery> |
||
;Elemental |
;Elemental |
||
| − | <gallery |
+ | <gallery captionalign=center> |
| − | + | TFT Draconic Infernal Arena.png|Infernal<br />Mission |
|
| − | + | TFT Draconic Mountain Arena.png|Mountain<br />Mission |
|
| − | + | TFT Draconic Cloud Arena.png|Cloud<br />Mission |
|
| − | + | TFT Draconic Ocean Arena.png|Ocean<br />Mission |
|
</gallery> |
</gallery> |
||
| + | ;Fate (Fate Battle Pass) |
||
| ⚫ | |||
| − | <gallery |
+ | <gallery captionalign=center> |
| − | + | TFT Fates Journey's Destination Arena.png|Journey's Destination<br />Free Battle Pass |
|
| − | + | TFT Fates Journey's Outset Arena.png|Journey's Outset<br />Premium Battle Pass |
|
| − | + | TFT Fates Journey's Path Arena.png|Journey's Path<br />Premium Battle Pass |
|
</gallery> |
</gallery> |
||
| − | }} |
||
| ⚫ | |||
| ⚫ | |||
| + | <gallery captionalign=center> |
||
| − | {{scroll box|maxheight=100%|content= |
||
| + | TFT Freljord Avarosa Arena.png|Avarosa<br />{{RP|1380}} |
||
| ⚫ | |||
| + | TFT Freljord Frostguard Arena.png|Frostguard<br />{{RP|1380}} |
||
| ⚫ | |||
| − | + | TFT Freljord Winter's Claw Arena.png|Winter's Claw<br />{{RP|1380}} |
|
| ⚫ | |||
| ⚫ | |||
</gallery> |
</gallery> |
||
;Galaxy |
;Galaxy |
||
| − | <gallery |
+ | <gallery captionalign=center> |
| − | + | TFT Galaxies Crash Site Arena.png|Crash Site<br />Mission |
|
| − | + | TFT Galaxies Pit Stop Arena.png|Pit Stop<br />Mission |
|
| − | + | TFT Galaxies Drifting Park Arena.png|Drifting Park<br />Mission |
|
| + | TFT Galaxies Dreadnova Arena.png|Dreadnova |
||
| + | TFT Galaxies Spaceship Arena.png|Spaceship |
||
</gallery> |
</gallery> |
||
| − | }} |
||
| + | ;Gizmos & Gadgets (Gizmos & Gadgets Battle Pass) |
||
| ⚫ | |||
| + | <gallery captionalign=center> |
||
| − | === Development === |
||
| + | TFT Gizmos & Gadgets Chemtech Plaza Arena.png|Chemtech Plaza<br/>Premium Battle Pass |
||
| − | Riot posted early concepts of some arena skins. <ref>[https://na.leagueoflegends.com/en/news/game-updates/features/tft-new-arena-skins Arena Skin Concepts]</ref> |
||
| + | TFT Gizmos & Gadgets Jinx's Explody-Fun-Land Arena.png|Jinx's Explody-Fun-Land<br />{{RP|1380}} |
||
| − | * Bilgewater |
||
| + | TFT Gizmos & Gadgets Shisa's Study Arena.png|Shisa's Study<br/>Premium Battle Pass |
||
| − | * Ionia |
||
| + | TFT Gizmos & Gadgets Sky-High Station Arena.png|Sky-High Station<br/>Premium Battle Pass |
||
| − | * Blood Moon |
||
| + | TFT Gizmos & Gadgets Vi's Pummel Pit Arena.png|Vi's Pummel Pit<br/>{{RP|1380}} |
||
| − | * Star Guardian |
||
| + | TFT Gizmos & Gadgets Zaun City Rooftop Arena.png|Zaun City Rooftop<br/>Free rewarded from Arcane event. |
||
| ⚫ | |||
| + | </gallery> |
||
| + | ;Lunar Revel |
||
| + | <gallery captionalign=center> |
||
| + | TFT Club 2 Arena.png|Club 2<br />{{RP|1900}} |
||
| + | TFT Lunar City Arena.png|Lunar City<br />{{RP|1380}} |
||
| + | TFT Lunar Revel Balcony Arena.png|Lunar Revel Balcony<br />Premium Battle Pass |
||
| + | TFT Lunar Revel Club Square Arena.png|Lunar Revel Club Square<br />Premium Battle Pass |
||
| + | TFT Lunar Revel Docks Arena.png|Lunar Revel Docks<br />Premium Battle Pass |
||
| + | TFT Golden Tiger Market Arena.png|Golden Tiger Market<br />Lunar Legend Festival Megabundle {{RP|12740}} |
||
| + | </gallery> |
||
| + | |||
| + | ;Neon Nights (Neon Nights Battle Pass) |
||
| + | <gallery captionalign=center> |
||
| + | TFT Gizmos & Gadgets II Celebration of Tomorrow Arena.png|Celebration of Tomorrow<br />Free Battle Pass |
||
| + | TFT Gizmos & Gadgets II Dawn of Progress Arena.png|Dawn of Progress<br />Premium Battle Pass |
||
| + | TFT Gizmos & Gadgets II Hextech Battle Arena.png|Hextech Battle<br />{{RP|1900}} or in Bundle. |
||
| + | TFT Gizmos & Gadgets II Innovation Avenue Arena.png|Innovation Avenue<br />Premium Battle Pass |
||
| + | TFT Gizmos & Gadgets II Toxitorium Arena.png|Toxitorium<br />Premium Battle Pass |
||
| + | </gallery> |
||
| + | |||
| + | ;Odyssey |
||
| + | <gallery captionalign=center> |
||
| + | TFT Odyssey Jinx Arena.png|Odyssey Jinx<br />{{RP|1380}} |
||
| + | TFT Odyssey Malphite Arena.png|Odyssey Malphite<br />{{RP|1380}} |
||
| + | TFT Odyssey Yasuo Arena.png|Odyssey Yasuo<br />{{RP|1380}} |
||
| + | </gallery> |
||
| + | |||
| + | ;Reckoning (Reckoning Battle Pass) |
||
| + | <gallery captionalign=center> |
||
| + | TFT Reckoning Count Spatula Arena.png|Count Spatula<br />{{RP|1380}} |
||
| + | TFT Reckoning Court of Chaos Arena.png|Court of Chaos<br />Premium Battle Pass |
||
| + | TFT Reckoning Realm of Harmony Arena.png|Realm of Harmony<br />Premium Battle Pass |
||
| + | TFT Reckoning Sanctum of Order Arena.png|Sanctum of Order<br />Premium Battle Pass |
||
| + | TFT Reckoning Splash Party Arena.png|Splash Party<br />{{RP|1380}} |
||
| + | </gallery> |
||
| + | |||
| + | ;Reckoning: Dawn of Heroes (Reckoning II Battle Pass) |
||
| + | <gallery captionalign=center> |
||
| + | TFT Reckoning II Dankest Dungeon Arena.png|Dankest Dungeon<br />Premium Battle Pass |
||
| + | TFT Reckoning II Desert Path Arena.png|Desert Path<br />Premium Battle Pass |
||
| + | TFT Reckoning II Golden Bakery Arena.png|Golden Bakery Arena<br />{{RP|1380}} or in Bundle. |
||
| + | TFT Reckoning II High Noon Saloon Arena.png|High Noon Saloon<br />{{RP|1380}} or in Bundle. |
||
| + | TFT Reckoning II Journey's Beginning Arena.png|Journey's Beginning<br />Premium Battle Pass |
||
| + | </gallery> |
||
| + | |||
| + | ;Spirit Blossom |
||
| + | <gallery captionalign=center> |
||
| + | TFT Spirit Blossom Kanmei Arena.png|Kanmei<br />{{RP|1380}} |
||
| + | TFT Spirit Blossom Festival Arena.png|Festival<br />{{RP|1380}} |
||
| + | TFT Spirit Blossom Akana Arena.png|Akana<br />{{RP|1380}} |
||
| + | </gallery>}} |
||
== Media == |
== Media == |
||
| Line 99: | Line 177: | ||
Music= |
Music= |
||
[[File:Teamfight Tactics Soundtrack|center|640 px]] |
[[File:Teamfight Tactics Soundtrack|center|640 px]] |
||
| ⚫ | |||
;Related Music |
;Related Music |
||
<gallery columns="5" widths="120" spacing="small" position="center" captionalign="center"> |
<gallery columns="5" widths="120" spacing="small" position="center" captionalign="center"> |
||
</gallery> |
</gallery> |
||
| ⚫ | |||
|-| |
|-| |
||
Videos= |
Videos= |
||
[[File:Teamfight Tactics Music - Behind the Scenes - Orchestra Recording Session|center|640px]] |
[[File:Teamfight Tactics Music - Behind the Scenes - Orchestra Recording Session|center|640px]] |
||
| + | <!-- |
||
;Related Videos |
;Related Videos |
||
<gallery columns="5" widths="120" spacing="small" position="center" captionalign="center"> |
<gallery columns="5" widths="120" spacing="small" position="center" captionalign="center"> |
||
</gallery> |
</gallery> |
||
| + | --> |
||
|-| |
|-| |
||
Gallery= |
Gallery= |
||
| − | <gallery |
+ | <gallery position="center" spacing="small" captionalign="center"> |
| − | Teamfight Tactics Arena Concept 01.jpg|Teamfight Tactics Arena Concept 1 (by Riot Artist [ |
+ | Teamfight Tactics Arena Concept 01.jpg|Teamfight Tactics Arena Concept 1 (by Riot Artist [[Ayhan Aydogan]]) |
| − | Teamfight Tactics Arena Concept 02.jpg|Teamfight Tactics Arena Concept 2 (by Riot Artist [ |
+ | Teamfight Tactics Arena Concept 02.jpg|Teamfight Tactics Arena Concept 2 (by Riot Artist [[Ayhan Aydogan]]) |
| − | Teamfight Tactics Arena Concept 03.jpg|Teamfight Tactics Arena Concept 3 (by Riot Artist [ |
+ | Teamfight Tactics Arena Concept 03.jpg|Teamfight Tactics Arena Concept 3 (by Riot Artist [[Ayhan Aydogan]]) |
| − | Teamfight Tactics Arena Concept 04.jpg|Teamfight Tactics Arena Concept 4 (by Riot Artist [ |
+ | Teamfight Tactics Arena Concept 04.jpg|Teamfight Tactics Arena Concept 4 (by Riot Artist [[Ayhan Aydogan]]) |
| − | Teamfight Tactics Arena Concept 05.jpg|Teamfight Tactics Arena Concept 5 (by Riot Artist [ |
+ | Teamfight Tactics Arena Concept 05.jpg|Teamfight Tactics Arena Concept 5 (by Riot Artist [[Ayhan Aydogan]]) |
| − | Teamfight Tactics Arena Concept 06.gif|Teamfight Tactics Arena Concept 6 (by Riot Artist [ |
+ | Teamfight Tactics Arena Concept 06.gif|Teamfight Tactics Arena Concept 6 (by Riot Artist [[Ayhan Aydogan]]) |
| ⚫ | |||
Teamfight Tactics 2019 small map.png|Map Layout Concept |
Teamfight Tactics 2019 small map.png|Map Layout Concept |
||
| + | Teamfight Tactics Minimap.png|Teamfight Tactics Minimap |
||
Teamfight Tactics 2019 background short.jpg|Teamfight Tactic Background 1 |
Teamfight Tactics 2019 background short.jpg|Teamfight Tactic Background 1 |
||
Teamfight Tactics 2019 gameflow background.jpg|Teamfight Tactic Background 2 |
Teamfight Tactics 2019 gameflow background.jpg|Teamfight Tactic Background 2 |
||
| Line 127: | Line 211: | ||
Teamfight Tactics Default Arena map.jpg|Default Arena map |
Teamfight Tactics Default Arena map.jpg|Default Arena map |
||
Mission Teamfight Tactics 2019 Map2.jpg|Teamfight Tactic Mission Map 2 |
Mission Teamfight Tactics 2019 Map2.jpg|Teamfight Tactic Mission Map 2 |
||
| − | Arena Default Concept 01.jpg|Default Arena Concept (by Riot Artist [ |
+ | Arena Default Concept 01.jpg|Default Arena Concept (by Riot Artist [[Grace Liu]]) |
| − | Arena Arrowhead Concept 01.jpg|Arrowhead Arena Concept (by Riot Artist [ |
+ | Arena Arrowhead Concept 01.jpg|Arrowhead Arena Concept (by Riot Artist [[Grace Liu]]) |
| − | Arena Runic Concept 01.jpg|Runic Arena Concept (by Riot Artist [ |
+ | Arena Runic Concept 01.jpg|Runic Arena Concept (by Riot Artist [[Grace Liu]]) |
| − | Arena Verdant Concept 01.jpg|Verdant Arena Concept (by Riot Artist [ |
+ | Arena Verdant Concept 01.jpg|Verdant Arena Concept (by Riot Artist [[Grace Liu]]) |
| − | Arena Rift Concept 01.jpg|Rift Arena Concept (by Riot Artist [ |
+ | Arena Rift Concept 01.jpg|Rift Arena Concept (by Riot Artist [[Grace Liu]]) |
| − | Arena Draconic Concept 01.jpg|Draconic Arena Concept 1 (by Riot Artist [ |
+ | Arena Draconic Concept 01.jpg|Draconic Arena Concept 1 (by Riot Artist [[Grace Liu]]) |
| − | Arena Draconic Concept 02.jpg|Draconic Arena Concept 2 (by Riot Artist [ |
+ | Arena Draconic Concept 02.jpg|Draconic Arena Concept 2 (by Riot Artist [[Grace Liu]]) |
| − | Arena Draconic Concept 03.jpg|Draconic Arena Concept 3 (by Riot Artist [ |
+ | Arena Draconic Concept 03.jpg|Draconic Arena Concept 3 (by Riot Artist [[Grace Liu]]) |
| − | Arena Avarosa Concept 01.jpg|Avarosa Arena Concept 1 (by Riot Artist [ |
+ | Arena Avarosa Concept 01.jpg|Avarosa Arena Concept 1 (by Riot Artist [[Grace Liu]]) |
| − | Arena Avarosa Concept 02.jpg|Avarosa Arena Concept 2 (by Riot Artist [ |
+ | Arena Avarosa Concept 02.jpg|Avarosa Arena Concept 2 (by Riot Artist [[Ayhan Aydogan]]) |
| − | Arena Frostguard Concept 01.jpg|Frostguard Arena Concept 1 (by Riot Artist [ |
+ | Arena Frostguard Concept 01.jpg|Frostguard Arena Concept 1 (by Riot Artist [[Grace Liu]]) |
| − | Arena Frostguard Concept 02.jpg|Frostguard Arena Concept 2 (by Riot Artist [ |
+ | Arena Frostguard Concept 02.jpg|Frostguard Arena Concept 2 (by Riot Artist [[Ayhan Aydogan]]) |
| − | Arena Winter'sClaw Concept 01.jpg|Winter's Claw Arena Concept 1 (by Riot Artist [ |
+ | Arena Winter'sClaw Concept 01.jpg|Winter's Claw Arena Concept 1 (by Riot Artist [[Grace Liu]]) |
| − | Arena Winter'sClaw Concept 02.jpg|Winter's Claw Arena Concept 2 (by Riot Artist [ |
+ | Arena Winter'sClaw Concept 02.jpg|Winter's Claw Arena Concept 2 (by Riot Artist [[Ayhan Aydogan]]) |
| − | Arena Winter'sClaw Concept 03.jpg|Winter's Claw Arena Concept 3 (by Riot Artist [ |
+ | Arena Winter'sClaw Concept 03.jpg|Winter's Claw Arena Concept 3 (by Riot Artist [[Ayhan Aydogan]]) |
| − | Arena Winter'sClaw Concept 04.jpg|Winter's Claw Arena Concept 4 (by Riot Artist [ |
+ | Arena Winter'sClaw Concept 04.jpg|Winter's Claw Arena Concept 4 (by Riot Artist [[Ayhan Aydogan]]) |
| − | Arena Winter'sClaw Concept 05.jpg|Winter's Claw Arena Concept 5 (by Riot Artist [ |
+ | Arena Winter'sClaw Concept 05.jpg|Winter's Claw Arena Concept 5 (by Riot Artist [[Ayhan Aydogan]]) |
| + | Arena CrashSite Concept 01.jpg|Crash Site Arena Concept |
||
| + | Arena DriftingPark Concept 01.jpg|Drifting Park Arena Concept |
||
| + | Arena Galaxy Concept 01.jpg|Galaxy Arena Concept (by Riot Artist [[Igor Artyomenko]]) |
||
| + | Arena Odyssey Concept 01.jpg|Odyssey Arena Concept (by Riot Artist [[Igor Artyomenko]]) |
||
| + | Arena Odyssey Jinx Concept 01.jpg|Odyssey Jinx Arena Concept (by Riot Artist [[Igor Artyomenko]]) |
||
| + | Arena Odyssey Malphite Concept 01.jpg|Odyssey Malphite Arena Concept (by Riot Artist [[Igor Artyomenko]]) |
||
| + | Arena Odyssey Yasuo Concept 01.jpg|Odyssey Yasuo Arena Concept (by Riot Artist [[Igor Artyomenko]]) |
||
| + | Arena Akana Concept 01.jpg|Akana Arena Concept 1 (by Riot Artist [[Igor Artyomenko]]) |
||
| + | Arena Akana Concept 02.jpg|Akana Arena Concept 2 (by Riot Artist [[Igor Artyomenko]]) |
||
| + | Arena Fates Concept 01.jpg|Fates Arena Concept (by Riot Artist [[Igor Artyomenko]]) |
||
| + | Arena Festival Concept 01.jpg|Festival Arena Concept (by Riot Artist [[Igor Artyomenko]]) |
||
| + | Arena Kanmei Concept 01.jpg|Kanmei Arena Concept (by Riot Artist [[Igor Artyomenko]]) |
||
| + | Arena Journey Concept 01.jpg|Journey Arena Concept (by Riot Artist [[Gino Whitehall]]) |
||
| + | Arena Ionia City Concept 01.jpg|Ionia City Arena Concept (by Riot Artist [[Igor Artyomenko]]) |
||
| + | Arena Ionia Temple Concept 01.jpg|Ionia Temple Arena Concept (by Riot Artist [[Igor Artyomenko]]) |
||
| + | Arena Noxus Invasion Concept 01.jpg|Noxus Invasion Arena Concept (by Riot Artist [[Igor Artyomenko]]) |
||
| + | High Noon Saloon Concept 01.jpg|High Noon Saloon Arena Concept (by Riot Artist [[Igor Artyomenko]]) |
||
| + | High Noon Saloon Concept 02.jpg|High Noon Saloon Arena Concept (by Riot Artist [[Igor Artyomenko]]) |
||
| + | Reckoning Dawn of Heroes Pass Arena Concept 01.jpg|Reckoning Dawn of Heroes Pass Arena Concept (by Riot Artist [[Igor Artyomenko]]) |
||
| + | Reckoning Dawn of Heroes Pass Arena Concept 02.jpg|Reckoning Dawn of Heroes Pass Arena Concept (by Riot Artist [[Igor Artyomenko]]) |
||
| + | Vi Pummel Pit Concept.jpg|Vi's Pummel Pit Concept (by Riot Artist [[Igor Artyomenko]]) |
||
| + | Toxitorium Arena Concept.jpg|Toxitorium Arena Concept (by Artist [[Igor Artyomenko]]) |
||
Teamfight Tactics Bilgewater Arena Concept 01.jpg|Bilgewater Arena Concept |
Teamfight Tactics Bilgewater Arena Concept 01.jpg|Bilgewater Arena Concept |
||
Teamfight Tactics Blood Moon Arena Concept 01.jpg|Blood Moon Arena Concept |
Teamfight Tactics Blood Moon Arena Concept 01.jpg|Blood Moon Arena Concept |
||
Teamfight Tactics Ionia Arena Concept 01.jpg|Ionia Arena Concept |
Teamfight Tactics Ionia Arena Concept 01.jpg|Ionia Arena Concept |
||
| ⚫ | |||
TFT Arena Menu.jpg|Arena Menu in [[V10.2]] |
TFT Arena Menu.jpg|Arena Menu in [[V10.2]] |
||
</gallery> |
</gallery> |
||
| + | |-| |
||
| − | {{clr}} |
||
| − | + | Summoner Icons= |
|
{{Main|Summoner icon}} |
{{Main|Summoner icon}} |
||
| − | <gallery position=center spacing=small widths=70 captionalign=center |
+ | <gallery position=center spacing=small widths=70 captionalign=center> |
Tier 1 TFT Launch profileicon.png|Teamfight Tactics Tier 1 Launch |
Tier 1 TFT Launch profileicon.png|Teamfight Tactics Tier 1 Launch |
||
Tier 2 TFT Launch profileicon.png|Teamfight Tactics Tier 2 Launch |
Tier 2 TFT Launch profileicon.png|Teamfight Tactics Tier 2 Launch |
||
| Line 162: | Line 267: | ||
</gallery> |
</gallery> |
||
</tabber> |
</tabber> |
||
| + | |||
| + | == Trivia == |
||
| + | * '''Pit Stop''' Arena was called "Landing Site" during development. |
||
| + | * '''Drifting Park''' Arena was called "Space Trees" during development. |
||
== Patch History == |
== Patch History == |
||
{{Scroll box|content= |
{{Scroll box|content= |
||
| + | ;[[V12.4 (Teamfight Tactics)|V12.4]] |
||
| + | * [[File:TFT Gizmos & Gadgets II Celebration of Tomorrow Arena.png|30px]] Celebration of Tomorrow Arena. |
||
| + | * [[File:TFT Gizmos & Gadgets II Dawn of Progress Arena.png|30px]] Dawn of Progress Arena. |
||
| + | * [[File:TFT Gizmos & Gadgets II Hextech Battle Arena.png|30px]] Hextech Battle Arena. |
||
| + | * [[File:TFT Gizmos & Gadgets II Innovation Avenue Arena.png|30px]] Innovation Avenue Arena. |
||
| + | * [[File:TFT Gizmos & Gadgets II Toxitorium Arena.png|30px]] Toxitorium Arena. |
||
| + | |||
| + | ;[[V11.23 (Teamfight Tactics)|V11.23]] or [[V11.24 (Teamfight Tactics)|V11.24]] |
||
| + | * [[File:TFT Gizmos & Gadgets Zaun City Rooftop Arena.png|30px]] Zaun Rooftop Arena added. |
||
| + | |||
| + | ;[[V11.22 (Teamfight Tactics)|V11.22]] |
||
| + | * [[File:TFT Gizmos & Gadgets Chemtech Plaza Arena.png|30px]] Chemtech Plaza Arena added. |
||
| + | * [[File:TFT Gizmos & Gadgets Jinx's Explody-Fun-Land Arena.png|30px]] Jinx's Explody-Fun-Land Arena added. |
||
| + | * [[File:TFT Gizmos & Gadgets Shisa's Study Arena.png|30px]] Shisa's Study Arena added. |
||
| + | * [[File:TFT Gizmos & Gadgets Sky-High Station Arena.png|30px]] Sky-High Station Arena added. |
||
| + | * [[File:TFT Gizmos & Gadgets Vi's Pummel Pit Arena.png|30px]] Vi's Pummel Pit Arena added. |
||
| + | |||
| + | ;[[V11.15 (Teamfight Tactics)|V11.15]] |
||
| + | * [[File:TFT Reckoning II Dankest Dungeon Arena.png|30px]] Dankest Dungeon Arena added. |
||
| + | * [[File:TFT Reckoning II Desert Path Arena.png|30px]] Desert Path Arena added. |
||
| + | * [[File:TFT Reckoning II Golden Bakery Arena.png|30px]] Golden Bakery Arena added. |
||
| + | * [[File:TFT Reckoning II High Noon Saloon Arena.png|30px]] High Noon Saloon Arena added. |
||
| + | * [[File:TFT Reckoning II Journey's Beginning Arena.png|30px]] Journey's Beginning Arena added. |
||
| + | |||
| + | ;[[V11.9 (Teamfight Tactics)|V11.9]] |
||
| + | * [[File:TFT Reckoning Count Spatula Arena.png|30px]] Count Spatula Arena added. |
||
| + | * [[File:TFT Reckoning Court of Chaos Arena.png|30px]] Court of Chaos Arena added. |
||
| + | * [[File:TFT Reckoning Realm of Harmony Arena.png|30px]] Realm of Harmony Arena added. |
||
| + | * [[File:TFT Reckoning Sanctum of Order Arena.png|30px]] Sanctum of Order Arena added. |
||
| + | * [[File:TFT Reckoning Splash Party Arena.png|30px]] Splash Party Arena added. |
||
| + | |||
| + | ;[[V10.19 (Teamfight Tactics)|V10.19]] |
||
| + | * [[File:TFT Spirit Blossom Akana Arena.png|30px]] Akana Arena added. |
||
| + | * [[File:TFT Spirit Blossom Festival Arena.png|30px]] Festival Arena added. |
||
| + | * [[File:TFT Spirit Blossom Kanmei Arena.png|30px]] Kanmei Arena added. |
||
| + | * [[File:TFT Fates Journey's Destination Arena.png |30px]] Journey's Destination Arena added. |
||
| + | * [[File:TFT Fates Journey's Path Arena.png|30px]] Journey's Path Arena added. |
||
| + | * [[File:TFT Fates Journey's Outset Arena.png|30px]] Journey's Outset Arena added. |
||
| + | |||
| + | ;[[V10.12 (Teamfight Tactics)|V10.12]] |
||
| + | * New arenas |
||
| + | ** Dreadnova |
||
| + | ** Spaceship |
||
| + | |||
| + | ;[[V10.9 (Teamfight Tactics)|V10.9]] |
||
| + | * New arenas: |
||
| + | ** [[File:TFT Odyssey Jinx Arena.png|30px]] Odyssey Jinx Arena. |
||
| + | ** [[File:TFT Odyssey Malphite Arena.png|30px]] Odyssey Malphite Arena. |
||
| + | ** [[File:TFT Odyssey Yasuo Arena.png|30px]] Odyssey Yasuo Arena. |
||
| + | |||
| + | ;[[V10.6 (Teamfight Tactics)|V10.6]] |
||
| + | * {{sbc|Removed:}} Elemental Hexes. |
||
| + | * Set 3 Arena skins becomes available |
||
| + | ** Black Hole |
||
| + | ** Celestial |
||
| + | ** Supernova |
||
| + | ** Crash Site |
||
| + | ** Pit Stop |
||
| + | ** Drifting Park |
||
| + | |||
;[[V9.24 (Teamfight Tactics)|V9.24]] |
;[[V9.24 (Teamfight Tactics)|V9.24]] |
||
* {{sbc|Bug Fix:}} Fixed a bug where you could get double the health bonus from Earth Hexes. |
* {{sbc|Bug Fix:}} Fixed a bug where you could get double the health bonus from Earth Hexes. |
||
| Line 173: | Line 342: | ||
;[[V9.22 (Teamfight Tactics)|V9.22]] |
;[[V9.22 (Teamfight Tactics)|V9.22]] |
||
* Board size increased to 4 rows of 7 hexes per player from 3 rows of 7 hexes per player. |
* Board size increased to 4 rows of 7 hexes per player from 3 rows of 7 hexes per player. |
||
| − | * Five new Arena Skins: Avarosa, Frostguard, Winter's Claw, Infernal, |
+ | * Five new Arena Skins: Avarosa, Frostguard, Winter's Claw, Infernal, Mountain. |
* Arena skins are now available in [[Riot Store]]. |
* Arena skins are now available in [[Riot Store]]. |
||
** Rift, Basic Draconic, Basic Summoner's and Storm Rift skins are not available. |
** Rift, Basic Draconic, Basic Summoner's and Storm Rift skins are not available. |
||
| Line 196: | Line 365: | ||
{{Riot Store}} |
{{Riot Store}} |
||
[[Category:Teamfight Tactics]] |
[[Category:Teamfight Tactics]] |
||
| − | [[Category:Arena]] |
+ | [[Category:TFT Arena]] |
[[Category:Map]] |
[[Category:Map]] |
||
| + | |||
| + | [[ru:Арена (Teamfight Tactics)]] |
||
Latest revision as of 01:01, 10 December 2023

Teamfight Tactics Arena
The Arena is the island that encompasses the battlefield of ![]() Teamfight Tactics, which includes the battlefield for champions to fight, the champion bench, and the Gold Generators.
Teamfight Tactics, which includes the battlefield for champions to fight, the champion bench, and the Gold Generators.
Each player has their own arena map and each player travels to another players map or attacks from their own arena depending on the round.
Gameplay
Layout

- Little Legend: A small being that the player is able to control around the map. A Little Legend is present at all times.
- Battlefield Side: Where the fighting happens. Allocated battlefield is hexagonal board with size 4 x 7, situated on the southern half. If your unit cap is not reached, the leftmost champion(s) on your Bench is automatically placed near the center of the Battlefield. If your Bench limit is reached and you enter the carousel, the champion you picked is placed on the bottom row, on the furthest left available space.
- Bench: Champions bought from the Store are placed here. Up to 9 champions are inventoried until you move them onto the battlefield.
- Store: You'll see a random selection of champions, including duplicates, from a shared pool in the store. Duplicate champions combine to create stronger versions of that champion. Possession of three duplicates will upgrade into one high-level champion (Bench & Battlefield). If there is no room on the bench but there is enough of a champion in the store to upgrade an owned one, then when the player tries to purchase one of them, enough will be bought to upgrade the unit and use no extra space.
- Lock/unlock the store: You can lock your store so that it won't automatically refresh at the start of the round. This is useful if there's something you want but can't afford in a given moment.
- Refresh (
 2): Pay a little gold to refresh the champions in the store. This happens for free at the start of each round, but sometimes you'll want to see more options.
 - Buy XP ( 4): Pay gold to gain 4 experience points. The higher your level, the more (powerful and expensive) champions you can pick from.
- Trait Tracker: Track the origin and class bonuses that your champions qualify for. Displays up to 10 origin and class. On other player arena, it shows that player trait bonuses instead.
- Item Inventory: Items go here until they're equipped to champions (drag and drop to equip). When you sell a champion with items equipped, the items return here. You can have up to 10 items. You can hover items together to see the combination.
- Gold Generators: Gold generators appear based on how much gold you already have. Each generator is worth one interest gold at the start of your next turn.
- Scoreboard: Tab 1 shows all players' health in the game. Click on players to view their arena. Tab 2 shows realtime damage output from your champions in the current round.
- Stage Tracker: Shows the current game element, and shows and records rounds of the current stage. It indicates rounds you won in blue, lost in red, current in yellow. Rounds that is not yet to play are gray out. Tells you which battle phase you're currently in and how much time is left.
- Opponent's Side: When facing another player's team, you'll also see their bench, item inventory, and gold generators. And of course, you'll encounter their Little Legend.
Battlefield
- This is where the fight happens. The battlefield is a rectangular board filled with 8 x 7 hexagons.
- When the round has not yet started, players can place and rearrange their champions on their half side (4 x 7) of the battlefield.
- There is a limit number of champions a player can play. This number increases as the game process, based on your Little Legend level.
- The number of champions appear on the battlefield and the maximum number of champions appear in the enemy area during preparing state.
- If your unit cap is not reached, the leftmost champion(s) on Bench is automatically placed near the center of the Battlefield.
- Players can increase the number of champions at the beginning on the battlefield by acquiring the item
 Force of Nature or
  Tactician's Crown.
 - When a round started, new units, and even new champions, may appear on the battlefield. This can come from abilities of champions or from their synergies.
Bench
- The area to stores champions player have bought but are not in the battlefield. Player have 9 slots in the bench.
- If a player enters the carousel with both of their battlefield and bench full, the new picked champion will appear in an available space in the bottom row.
- While this is happening, players cannot reposition or swap them from champions in the bench.
- The number of champions on your side exceeds the limit.
- If the number of benched champions is decreased, the number of champions needed reduce the units on the board to your level will be returned to the Bench randomly and automatically if possible, if not, only the amount equal to the amount of freed space will be transferred.
 |
|---|
Elemental Hex
Each game of TFT in Set 2 will have an element assigned, spawing elemental hexes of that element during the planning phase. The hexes will spawn in the same places for all players on every round; the first appears at Stage 1-1, and the second one appears at Stage 3–1.
A Champion that occupies the hex when the round starts may gain an elemental buff in the form of an item, provided that their inventory is not full. This buff is retained through the combat phase.
The elemental hexes return as a mechanic of the Ixtal in Set 9.5 feature that changes each element according to the different games.Skins
With the Battle Pass, players can earn Battle Pass arena skins. Some are from the free pass, for example, the ![]() Celebration of Tomorrow. While some requires the premium ticket, for example, the
Celebration of Tomorrow. While some requires the premium ticket, for example, the ![]() Toxitorium.
Toxitorium.
Outside of Battle Pass, player can buy Arena either directly (most purchaseable Arena), in bundle (![]() Golden Tiger Market), or in game of chance.[1]
Golden Tiger Market), or in game of chance.[1]
- Base
")
")
Mission or
")
Mission
")
Mission or
")
Mission
")
Mission or
")
Mission
")
Mission
- Dark Star
")
")
")
- Elemental
")
Mission
")
Mission
")
Mission
")
Mission
- Fate (Fate Battle Pass)
")
Free Battle Pass
")
Premium Battle Pass
")
Premium Battle Pass
- Freljord
")
")
")
- Galaxy
")
Mission
")
Mission
")
Mission
")
")
- Gizmos & Gadgets (Gizmos & Gadgets Battle Pass)
")
Premium Battle Pass
")
")
Premium Battle Pass
")
Premium Battle Pass
")
")
Free rewarded from Arcane event.
- Lunar Revel
")
")
")
Premium Battle Pass
")
Premium Battle Pass
")
Premium Battle Pass
")
Lunar Legend Festival Megabundle
- Neon Nights (Neon Nights Battle Pass)
")
Free Battle Pass
")
Premium Battle Pass
")
")
Premium Battle Pass
")
Premium Battle Pass
- Odyssey
")
")
")
- Reckoning (Reckoning Battle Pass)
")
")
Premium Battle Pass
")
Premium Battle Pass
")
Premium Battle Pass
")
- Reckoning
- Dawn of Heroes (Reckoning II Battle Pass)
")
Premium Battle Pass
")
Premium Battle Pass
")
")
")
Premium Battle Pass
- Spirit Blossom
")
")
")
Media

")
")
")
")
")
")
")
")
")
")
")
")
")
")
")
")
")
")
")
")
")
")
")
")
")
")
")
")
")
")
")
")
")
")
")
")
")
")
")
")
")
")
")
")
")
")
")
")
")
")
")
")
")
")
")
")
")
")
")
")
")
- Main article: Summoner icon
")
")
")
")
")
")
Trivia
- Pit Stop Arena was called "Landing Site" during development.
- Drifting Park Arena was called "Space Trees" during development.
Patch History
- Celebration of Tomorrow Arena.
- Dawn of Progress Arena.
- Hextech Battle Arena.
- Innovation Avenue Arena.
- Toxitorium Arena.
- Zaun Rooftop Arena added.
- Chemtech Plaza Arena added.
- Jinx's Explody-Fun-Land Arena added.
- Shisa's Study Arena added.
- Sky-High Station Arena added.
- Vi's Pummel Pit Arena added.
- Dankest Dungeon Arena added.
- Desert Path Arena added.
- Golden Bakery Arena added.
- High Noon Saloon Arena added.
- Journey's Beginning Arena added.
- Count Spatula Arena added.
- Court of Chaos Arena added.
- Realm of Harmony Arena added.
- Sanctum of Order Arena added.
- Splash Party Arena added.
- Akana Arena added.
- Festival Arena added.
- Kanmei Arena added.
- Journey's Destination Arena added.
- Journey's Path Arena added.
- Journey's Outset Arena added.
- New arenas
- Dreadnova
- Spaceship
- New arenas:
- Odyssey Jinx Arena.
- Odyssey Malphite Arena.
- Odyssey Yasuo Arena.
- Removed: Elemental Hexes.
- Set 3 Arena skins becomes available
- Black Hole
- Celestial
- Supernova
- Crash Site
- Pit Stop
- Drifting Park
- Bug Fix: Fixed a bug where you could get double the health bonus from Earth Hexes.
- Two Arena skins Cloud and Ocean is now available.
- Board size increased to 4 rows of 7 hexes per player from 3 rows of 7 hexes per player.
- Five new Arena Skins: Avarosa, Frostguard, Winter's Claw, Infernal, Mountain.
- Arena skins are now available in Riot Store.
- Rift, Basic Draconic, Basic Summoner's and Storm Rift skins are not available.
- Elemental Hexes:
- First Hex at Stage 1-1, Second Hex at Stage 3-1.
- Cloud Hex: This unit gains an additional 20% chance to dodge enemy basic attacks.
- Ocean Hex: This unit starts combat with an additional 30 starting mana.
- Inferno Hex: This unit starts combat with an additional 30% attack speed.
- Mountain Hex: At the end of the planning phase, this unit permanently gains 30 maximum health for the rest of the game.
- One new Arena Skin: Storm Rift
- Three new Arena Skins: Basic Verdant, Basic Draconic, Basic Summoner's
- Four new Arena Skins: Default, Runic, Arrowhead, Rift
References
| Currencies | |
|---|---|
| Direct Items | |
| Hextech Crafting Items | |
| Game Systems | |
| Teamfight Tactics Store |
|
| Legends of Runeterra Store |
|
| Wild Rift Store |
|
| Merch Store |